The Consumer Product Safety Improvement Act is a great big law that puts a world of restrictions on children's toys. These restrictions are on materials, decorations, all the components that make up a thing, to reduce the exposure children have to dangerous substances like lead and phthalates. The legislation requires exhaustive and expensive testing of children’s products and specific labeling rules. What it really boils down to is that a plethora of small businesses will go out of business. The law was not designed with the handcrafter in mind. But, that's not why I'm here.
I'm here today to tell you that there is a reason why I say on every listing that my Gnomes are not intended for children under 12 years old. My items are not made for children. This should be obvious in Spirit Dolls and japa mala, but Garden Gnomes are cute, and they're the right size for little hands. Even so, they are not made for children.
My Gnomes are made for the adult collector. They are made sturdy, but I cannot promise they would hold up to rigorous play. They are meant as decorations, not toys. I have never crocheted something intended for children, and I still don't.
I am using materials that are currently exempt from CPSIA testing. If a Gnome gets in the hands of a child, you can be assured that the dangerous materials that CPSIA is trying to guard against are not a part of my Gnomes. However, they do contain small parts, as in the polybeads I use for weight. This product is intended to be used for decorative items only (as stated on the bag by the manufacturer), and that is what I use them for.
Garden Gnomes may be cute and fun, but they are not toys, and were never intended to be toys. My Gnomes are not tested for lead and phthalates, are not labeled as toys, and do contain small parts not suitable for children. Please treat your Gnomes as decorative soft sculpture items. This is how I intend them, this is what I am thinking when I make them. Please keep this in mind when ordering.
Thank you.
Showing posts with label info. Show all posts
Showing posts with label info. Show all posts
Thursday, October 8, 2009

Thursday, February 12, 2009
The Evolution of a Garden Gnome
I made two Gnomes in this first style. There was the original Garden Gnome, and Happy Doctor Gnome, who was female (and therefore beardless) but with the same style hat. Happy Doctor Gnome was made in honor of another friend of mine, who is a doctor and doesn't hold it against me that I'm not very fond of many of them.

The only problem with these first two Gnomes is simply that I wasn't liking the hat, and the hair and beard process took forever and still didn't look exactly the way I wanted it to.
The next Garden Gnome got completely crocheted hair and beard, much like the hair I used on Happy Doctor Gnome, and a different style hat. This guy reminds many people of Santa Klaus. While the hat was improved, I still wasn't happy with it, and I was quite unhappy with the hair and beard process on Santa Gnome.

I bought some more amigurumi books and messed with some more patterns. I made a set of Garden Gnomes as Wizard of Oz characters. This came with its own complications. The new Gnome hat design worked great for the Scarecrow, Dorothy's hair needs some adjusting, but it works. The Cowardly Lion has a mane, which is not unlike a beard. Building upon the original Garden Gnome's hair and beard, and taking advice from the tips in one of my books, I ended up with a great Cowardly Lion.


I learned something else from my Wizard of Oz Gnomes. I wasn't happy with Garden Gnome hats of either style. While they were both the conical shape I wanted them, they just didn't look right. The Tin Man has a funnel headpiece and, in its construction, I learned how to adjust the slope and still get the hat wide enough to cover the head. With quite a few adjustments for Garden Gnome hats, I've finally gotten them just right. The way the hat sits on their little Gnome heads has made it necessary to fill their bottoms with polybeads for weight. This makes them not suitable as toys for young children. But, at least they'll stand up with minimal squishing.


My world is a gnomish place!

The only problem with these first two Gnomes is simply that I wasn't liking the hat, and the hair and beard process took forever and still didn't look exactly the way I wanted it to.
The next Garden Gnome got completely crocheted hair and beard, much like the hair I used on Happy Doctor Gnome, and a different style hat. This guy reminds many people of Santa Klaus. While the hat was improved, I still wasn't happy with it, and I was quite unhappy with the hair and beard process on Santa Gnome.

I bought some more amigurumi books and messed with some more patterns. I made a set of Garden Gnomes as Wizard of Oz characters. This came with its own complications. The new Gnome hat design worked great for the Scarecrow, Dorothy's hair needs some adjusting, but it works. The Cowardly Lion has a mane, which is not unlike a beard. Building upon the original Garden Gnome's hair and beard, and taking advice from the tips in one of my books, I ended up with a great Cowardly Lion.

This lead to the next stage of Garden Gnome evolution. Still with the same hairing method of the original Garden Gnome, I eliminated head hair, and just did a beard and mustache. I trimmed more of the beard and combed it out like I did for the Cowardly Lion.

I learned something else from my Wizard of Oz Gnomes. I wasn't happy with Garden Gnome hats of either style. While they were both the conical shape I wanted them, they just didn't look right. The Tin Man has a funnel headpiece and, in its construction, I learned how to adjust the slope and still get the hat wide enough to cover the head. With quite a few adjustments for Garden Gnome hats, I've finally gotten them just right. The way the hat sits on their little Gnome heads has made it necessary to fill their bottoms with polybeads for weight. This makes them not suitable as toys for young children. But, at least they'll stand up with minimal squishing.

I have a specific idea of what I think a Garden Gnome should look like and, after six months of evolution, I finally felt they were perfect. It was September-ish that I finally settled on the design.

My world is a gnomish place!
Monday, February 2, 2009
Garden Gnomes: The Beginning
Almost a year ago, a friend of mine was having some odd health issues. She was gaining weight and couldn't diet or exercise it off. She was extremely tired and spent a lot of time feeling ill. She thought she had a parasite in her stomach. Her partner teased her about that, and said it was a garden gnome. Truly, I have no idea how she came up with that!
In honor of her partner's assessment, I made my friend the very first Garden Gnome.

She spent quite a while dealing with her complaints until one morning, when she swore up and down that she could feel the mysterious Garden Gnome parasite moving around in her belly. With great concern, she left work to see a doctor and returned with news that shocked everyone but me: she was seven months pregnant! I had told her it was probably that, but she denied it with certainty.
As it happened, the nickname of Garden Gnome just stuck with her little son, so I suppose I could say my little godson is the inspiration behind my Garden Gnomes, and definitely why they are the main focus of my crocheting. How is that for a beginning?

Next: Garden Gnomes evolve, did you know they could?
In honor of her partner's assessment, I made my friend the very first Garden Gnome.

She spent quite a while dealing with her complaints until one morning, when she swore up and down that she could feel the mysterious Garden Gnome parasite moving around in her belly. With great concern, she left work to see a doctor and returned with news that shocked everyone but me: she was seven months pregnant! I had told her it was probably that, but she denied it with certainty.
As it happened, the nickname of Garden Gnome just stuck with her little son, so I suppose I could say my little godson is the inspiration behind my Garden Gnomes, and definitely why they are the main focus of my crocheting. How is that for a beginning?

Next: Garden Gnomes evolve, did you know they could?
Sunday, January 25, 2009
Three-Legged Good Luck Piggies
In Chile, small pigs are considered lucky. Small, three-legged pigs are even luckier. They are usually made out of pottery and given to friends as a token of good luck.
I have a few of these pottery piggies that I bought at a Smithsonian gift shop. I made the first Three-Legged Good Luck Piggy to be given in a Yule gift exchange. He took an amazing four hours to complete, a time that still baffles me (really because it's longer than a Garden Gnome and I feel the Gnomes are more complex) and I've been completely unable to reduce that at all.
 The first Yule Piggy
While my Three-Legged Good Luck Piggies are not pottery, they are made with the same care and good intentions as any traditional chanchito. I have since refined the pattern from the first Yule piggy. Every subsequent piggy has taken four to six hours to complete.
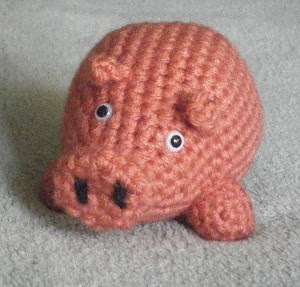 A rust-colored Piggy
What is really interesting is that every piggy has a different stance and curious, almost bemused, facial expression.
 An albino Piggy
I enjoy making these guys, despite how long they take to craft. They will be a feature in the shop.
I have a few of these pottery piggies that I bought at a Smithsonian gift shop. I made the first Three-Legged Good Luck Piggy to be given in a Yule gift exchange. He took an amazing four hours to complete, a time that still baffles me (really because it's longer than a Garden Gnome and I feel the Gnomes are more complex) and I've been completely unable to reduce that at all.
 The first Yule Piggy
 A rust-colored Piggy
What is really interesting is that every piggy has a different stance and curious, almost bemused, facial expression.
 An albino Piggy
I enjoy making these guys, despite how long they take to craft. They will be a feature in the shop.
Saturday, January 10, 2009
Spirit Dolls
My spirituality is a large part of my life. As such, I enjoy making things with spiritual significance. That is one of the reasons why I enjoy making malas so much.
It was about a year ago when I had the idea to make Spirit Dolls. The first pair were gifts for friends, but I enjoyed creating them so much that I had to continue.
I have not been able to pinpoint an origin of this tradition, though some of it is in Native American practice and Voodoo. My Spirit Dolls represent a quality, ability, or influence that you wish to draw to you and manifest in your life. This form of doll making is completely freestyle, allowing any and all materials from synthetic fabric to natural wood parts. They are often decorated or stuffed with things that aid whatever quality or ability they represent. The dolls, which can take any form, embody that quality or ability, so you can use it within your own life. To use a Spirit Doll, reflect and meditate upon its qualities, keep it by your bed, or spend time holding it each day.
A few pictures of previous dolls are below. Currently, the shop will open with the bottom two available.
 The wing of the Phoenix, a gift for my roommate.
 This doll was fashioned to represent resilience. It takes the shape of a volcano, and embodies the ability to recover in the face of great destruction or hardship.
 This doll is a symbol of protection, as a mighty tree stands guard in a forest.
Because of the nature of spirit dolls, I cannot really plan to make one. Much thought and energy go into their creation, and I have found that I can only make them when the mood strikes me. My Spirit Dolls are made in a sacred space, and sometimes as part of a larger ritual. All are cleansed and charged with Reiki during and after construction. Each doll is completely made by hand and is one of a kind. While I can make multiple dolls with similar properties, no two will ever be the same. These are sacred, spiritual objects and not intended or suitable to be toys for children.
It was about a year ago when I had the idea to make Spirit Dolls. The first pair were gifts for friends, but I enjoyed creating them so much that I had to continue.
I have not been able to pinpoint an origin of this tradition, though some of it is in Native American practice and Voodoo. My Spirit Dolls represent a quality, ability, or influence that you wish to draw to you and manifest in your life. This form of doll making is completely freestyle, allowing any and all materials from synthetic fabric to natural wood parts. They are often decorated or stuffed with things that aid whatever quality or ability they represent. The dolls, which can take any form, embody that quality or ability, so you can use it within your own life. To use a Spirit Doll, reflect and meditate upon its qualities, keep it by your bed, or spend time holding it each day.
A few pictures of previous dolls are below. Currently, the shop will open with the bottom two available.
 The wing of the Phoenix, a gift for my roommate.
 This doll was fashioned to represent resilience. It takes the shape of a volcano, and embodies the ability to recover in the face of great destruction or hardship.
 This doll is a symbol of protection, as a mighty tree stands guard in a forest.
Because of the nature of spirit dolls, I cannot really plan to make one. Much thought and energy go into their creation, and I have found that I can only make them when the mood strikes me. My Spirit Dolls are made in a sacred space, and sometimes as part of a larger ritual. All are cleansed and charged with Reiki during and after construction. Each doll is completely made by hand and is one of a kind. While I can make multiple dolls with similar properties, no two will ever be the same. These are sacred, spiritual objects and not intended or suitable to be toys for children.
Monday, January 5, 2009
What's in a Mala?
Strands of prayer beads will be a feature in my shop. I made my first strands of prayer beads more than two years ago. At the time, I was going on inspiration, and knew little about the history of such things or their common use, with the exception of a Catholic Rosary.
The first three strings of prayer beads each had 28 wooden beads (27 being one quarter of a traditional strand of 108 beads and one guru bead). They were strung on colored hemp cord with a decorative ceramic bead and a cotton tassel.

More than a year later, I went to a mala workshop and learned much more about the craft of making malas, as far as technique. In the workshop, we used gemstones, silk cord, and knotted between each bead. Since then, I have made many malas, and I have even repaired the first mala I ever made: the hemp cord had worn out with use. A selection of those malas are below.

Number 1 is the mala I made at the workshop. It is half length with fifty four beads of aragonite, green aventurine, and rose quartz strung on green silk and finished with a pewter tree of life charm. The guru bead is silver.
Number 2 is a full length, 108 bead strand of labradorite, fluorite, and moonstone strung on silver silk with a sterling silver guru bead and a tassel. The moonstones were extremely disappointing, with holes not drilled all the way through or not a consistent size. I attempted to expand them with a bead reamer, but that just broke most of them. On a strand of about sixty moonstones, I could only use twenty of them. Very disappointing. I made this strand of mala four times, as I encountered more and more problems with the moonstones. I'm happy with it now, but I would have liked more moonstones. Labradorite is one of my all-time favorite gemstones.
Number 3 is another full length mala made of sodalite, howlite, and blue lace agate on blue silk with a sterling silver guru bead and a tassel. When I was born, my eyes were the color of blue lace agate, and my mother had a necklace made for me. That stone is rather special to me.
Number 4 is a small wrist mala, one quarter of the full length strands, with twenty seven small kyanite beads strung on silver silk and finished with a blue silk tassel. One end is a lobster claw clasp because the small beads were just not long enough to go over my hand. The guru bead is pewter. Kyanite is good for balancing all chakras and never needs to be cleansed.
Number 5 is another wrist mala with much larger beads. This one is blue lace agate, labradorite, and fluorite with a pewter guru bead on silver silk with a blue tassel. For the sake of perfecting the design, I put a clasp on this one as well. The beads are so big that it's not necessary, it will easily slip over a hand (even a large one), but I want to start making more small ones like the kyanite. I think I have a good method for this as well. I may end up redoing this strand without the clasp.
The last one, number 6, is my very first mala remade. This time, the original wooden beads were strung on cotton cord. The holes in the beads are too large for hand-knotting, so I put glass spacer beads in between, and reused the original cotton tassel. As this was my first, and with no previous instruction, it is my favorite and the one I use most often. Though the kyanite is quickly gaining ground (so to speak). I enjoy holding that stone so much.
The following is the information I have included with malas when given to friends and family as gifts; I will likely revise it for the malas sold in the shop. It is a little bit about what they are and how to use them. Much of this information came from the workshop or is based on that, or from a collection of books I have on the subject.
A japa mala is a tool of meditation. Japa means repetition and mala is the word for string of beads or garland in Sanskrit.
Malas were first a part of Hindu traditions that were later adopted by Buddhists, and much later by Christians. These strands of beads consist of a symbolic number of beads strung together with one center bead, called the guru bead, and finished with a tassel or charm. The practice of moving each bead is an extension of focus and concentration, often while reciting a mantra: poem, prayer, or affirmation that promotes a specific feeling or result.
To use your mala, hold it between your thumb and middle finger, it is traditionally never touched with the index finger, and advance the beads with your thumb. If you reach the end and want to continue, turn the string around and go the other way; it is disrespectful to the energies you put into it to cross the guru bead, which stores all the work you do with your mala.
You can choose any mantra for use with your mala. Positive affirmations are very useful; say it once for each bead in slow, rhythmic, meaningful repetition. This is an exercise in calming and meditation. With practice, it will more easily transition you into a meditative state whenever you hold your mala.
It is customary to bless your mala, that the use of it will bring you comfort, love, and peace. You may do this in a ritual or by smudging. You also want to develop an affinity with your mala, which can be done by wearing your beads like a necklace, carrying them with you and touching them regularly, or sleeping with them under your pillow.
Your mala is a sacred object and should be treated with respect as such. Malas should not be left lying around carelessly, tossed, tangled, or stepped on. It should be kept in its pouch when not in use. Should your mala need to be cleaned, you can do so with a damp cloth. Immersing a mala in water will weaken the cord it is strung on.
I find the act of making a mala to be as calming and meditative as using and working with one. It is a task that I very much enjoy.
My malas will come with a pouch for storage and a special affirmation relating to the properties of the stones used. They will be cleansed and charged with Reiki before leaving my hands on their way to yours, but you will want to cleanse and charge them yourself when you get them.
The first three strings of prayer beads each had 28 wooden beads (27 being one quarter of a traditional strand of 108 beads and one guru bead). They were strung on colored hemp cord with a decorative ceramic bead and a cotton tassel.

More than a year later, I went to a mala workshop and learned much more about the craft of making malas, as far as technique. In the workshop, we used gemstones, silk cord, and knotted between each bead. Since then, I have made many malas, and I have even repaired the first mala I ever made: the hemp cord had worn out with use. A selection of those malas are below.

Number 1 is the mala I made at the workshop. It is half length with fifty four beads of aragonite, green aventurine, and rose quartz strung on green silk and finished with a pewter tree of life charm. The guru bead is silver.
Number 2 is a full length, 108 bead strand of labradorite, fluorite, and moonstone strung on silver silk with a sterling silver guru bead and a tassel. The moonstones were extremely disappointing, with holes not drilled all the way through or not a consistent size. I attempted to expand them with a bead reamer, but that just broke most of them. On a strand of about sixty moonstones, I could only use twenty of them. Very disappointing. I made this strand of mala four times, as I encountered more and more problems with the moonstones. I'm happy with it now, but I would have liked more moonstones. Labradorite is one of my all-time favorite gemstones.
Number 3 is another full length mala made of sodalite, howlite, and blue lace agate on blue silk with a sterling silver guru bead and a tassel. When I was born, my eyes were the color of blue lace agate, and my mother had a necklace made for me. That stone is rather special to me.
Number 4 is a small wrist mala, one quarter of the full length strands, with twenty seven small kyanite beads strung on silver silk and finished with a blue silk tassel. One end is a lobster claw clasp because the small beads were just not long enough to go over my hand. The guru bead is pewter. Kyanite is good for balancing all chakras and never needs to be cleansed.
Number 5 is another wrist mala with much larger beads. This one is blue lace agate, labradorite, and fluorite with a pewter guru bead on silver silk with a blue tassel. For the sake of perfecting the design, I put a clasp on this one as well. The beads are so big that it's not necessary, it will easily slip over a hand (even a large one), but I want to start making more small ones like the kyanite. I think I have a good method for this as well. I may end up redoing this strand without the clasp.
The last one, number 6, is my very first mala remade. This time, the original wooden beads were strung on cotton cord. The holes in the beads are too large for hand-knotting, so I put glass spacer beads in between, and reused the original cotton tassel. As this was my first, and with no previous instruction, it is my favorite and the one I use most often. Though the kyanite is quickly gaining ground (so to speak). I enjoy holding that stone so much.
The following is the information I have included with malas when given to friends and family as gifts; I will likely revise it for the malas sold in the shop. It is a little bit about what they are and how to use them. Much of this information came from the workshop or is based on that, or from a collection of books I have on the subject.
A japa mala is a tool of meditation. Japa means repetition and mala is the word for string of beads or garland in Sanskrit.
Malas were first a part of Hindu traditions that were later adopted by Buddhists, and much later by Christians. These strands of beads consist of a symbolic number of beads strung together with one center bead, called the guru bead, and finished with a tassel or charm. The practice of moving each bead is an extension of focus and concentration, often while reciting a mantra: poem, prayer, or affirmation that promotes a specific feeling or result.
To use your mala, hold it between your thumb and middle finger, it is traditionally never touched with the index finger, and advance the beads with your thumb. If you reach the end and want to continue, turn the string around and go the other way; it is disrespectful to the energies you put into it to cross the guru bead, which stores all the work you do with your mala.
You can choose any mantra for use with your mala. Positive affirmations are very useful; say it once for each bead in slow, rhythmic, meaningful repetition. This is an exercise in calming and meditation. With practice, it will more easily transition you into a meditative state whenever you hold your mala.
It is customary to bless your mala, that the use of it will bring you comfort, love, and peace. You may do this in a ritual or by smudging. You also want to develop an affinity with your mala, which can be done by wearing your beads like a necklace, carrying them with you and touching them regularly, or sleeping with them under your pillow.
Your mala is a sacred object and should be treated with respect as such. Malas should not be left lying around carelessly, tossed, tangled, or stepped on. It should be kept in its pouch when not in use. Should your mala need to be cleaned, you can do so with a damp cloth. Immersing a mala in water will weaken the cord it is strung on.
I find the act of making a mala to be as calming and meditative as using and working with one. It is a task that I very much enjoy.
My malas will come with a pouch for storage and a special affirmation relating to the properties of the stones used. They will be cleansed and charged with Reiki before leaving my hands on their way to yours, but you will want to cleanse and charge them yourself when you get them.
Subscribe to:
Posts (Atom)

